11 Steps of Chain Link Fence Installation
Chain link fence has been the prime for many homeowners. Not only the cost is quite affordable, but also it is suitable for DIY. Residential chain link fence can be installed around your backyard, swimming pool or garden. If you've decided to install the fence on your own, maybe you will make some mistakes. Don't worry about that. Follow our installation instructions, you can avoid them.
Step 1: Preparation before install
- Check all the regulations about fence setbacks, type and height.
- Be sure to determine the property boundary.
- Call 811 to mark the utility lines for free.
- Review any neighborhood covenants for regulations on fencing, such as height and style.
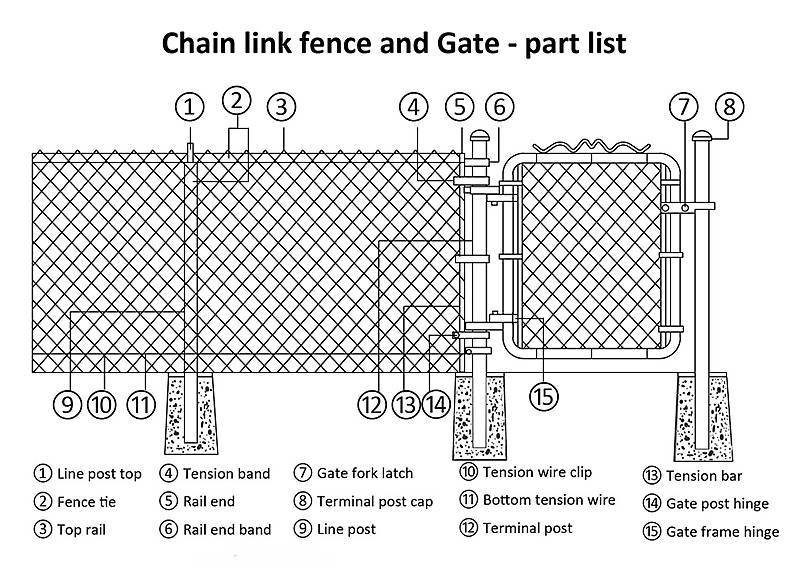
Chain link fence installation sketch.
Step 2: Mark the fence location
- Locate your property's line. All posts should be set about 4 inches inside the line.
- Measure the total length of your planned fence to determine the length of fence fabric and top rail.
- Mark the exact location of terminal post with a stake or spray paint.
Step 3: Install terminal posts
- Dig the terminal post holes (about 8 inches in diameter and 30 inches deep). Slope the sides with wider at the bottom than at the top.
- Mark the ground line on the posts with chalk. The height of terminal post above level ground should equal to the height of the fabric plus 2 inches.
- Put the post in the center of the hole and make sure the post is plumb and set at the right height.
- Pour concrete around the post. Smooth the surface with a trowel, sloping away from the post to let water run away.
- Repeat until all terminal posts are installed.
Step 4: Locate line posts
- Run a string line between the terminal posts and the string should be positioned on the outside face of the terminal posts.
- Measure the distance between the terminal posts, and calculate the number of line posts and spacing. The spacing should not be more than 10 ft.
Step 5: Install line posts
- Dig the line post holes - 6 inches diameter and 18 to 24 inches deep with sloping sides (bottom wider than top).
- The height of line posts, above level ground equals the height of the fabric minus 2 inches.
- Repeat the terminal post installation steps for each line post.
Step 6: Secure bands and caps to the posts
- Slide tension bands and brace band with rail ends onto the terminal posts.
- The long, flat surface of tension bands should face toward the outside of the fence.
- Use one less tension band than the height of the fence in feet.
- Add the caps for posts.
Step 7: Install the top rail
- Feed the top rail through the line post loop caps. The offset round side should be toward the outside of the fence.
- Continue by forcing swedge end top rail together through line post tops. (if swedge top rail is not used, top rail sleeves will be used).
- Cut to top rail carefully at the last length.
Step 8: Hang the fence fabric
- Unroll chain link fence fabric on the ground along the outside of the fence line from one terminal post to the next terminal post.
- Slide a tension bar through the first row of chain-link diamonds.
- Secure to the tension bar by tension bands.
- Walk along the fabric and stand it up against the fence frame.
- Take out the slack as you go.
- Loosely attach the fabric to the rail with fence ties.
Step 9: Stretching the fabric
- Temporarily slide a tension bar about 3 feet inside the unattached end of fabric.
- Fasten the stretcher to the tension bar and the other end to terminal post.
- Stretch the fabric.
- Remove the tension bar.
- Adjust the fabric to exact length.
- Insert a tension bar at the end of the fabric and secure to terminal post.
- Cut away the excess wire.
Step 10: Install fence ties
- Fasten the fabric along the top rail every 24 inches apart.
- 12 inches apart on each line post.
- Tighten all nuts on rail end bands and tension bands.
Step 11: Hang the gate
- Secure gate post hinges about 8 inches from the top and the bottom.
- Apply gate frame hinges to the frame.
- Hang the gate in place.
- Tighten the bolts of the bottom frame hinge first, then the top.
- Place the gate fork at a convenient height.
- Tighten all bolts securely.